Quick Links
Removing Sod for Designs:
Cut, Dig and Roll Technique
Tiller Technique
Smoother Technique
Setting up the Raised Bed
To be a successful gardener, you must start off with the best garden space by which to plant your design. A raised bed is a great garden space to create. It is inexpensive, and easy to maintain. The key is preparation. Below are directions to help you create the best raised bed that will help you in your gardening journey.
Supplies
Landscape cloth
Raised bed
Tape measure
Wooden stakes or lawn paint
Scissors
Mulch, optional
Directions
- Measure and mark off your garden space where your raised bed will be located. If you are going to use more than one bed, make sure to leave three feet between beds.
- Prepare the garden space by mowing down the grass so that it is as short as possible.
- Lay down landscape cloth over the area and secure it to the ground.
- Place your raised bed(s) on the landscape cloth.
- If setting up more than one bed, cover the space between the beds with a layer of mulch. (optional)
Creating your Raised Bed Soil
Once you have built and placed your raised bed in your garden space, the next step is to fill it. While you could just get some all purpose soil to fill your bed, it does not contain ingredients that are important to raised bed gardening, such as peat moss for water retention.
Supplies
1/3 peat moss
1/3 vermiculite
1/3 finished or seasoned compost
Bucket
Shovel
Wheelbarrow or large container
Directions
- Place a bucket of each ingredient in a large container or wheelbarrow.
- Mix ingredients completely.
- Continue with this process until the proper amount of garden soil is created.
Filling Your Raised Bed
The chore of filling a raised bed seems simple but there is a science behind the technique. A raised bed filled to the top will overflow when watered,
which is a waste. Not adding enough prepared soil will not provide your plants enough growing medium to be successful. The ½ inch from the top rim is
the ideal level the soil should be for a raised bed.
Supplies
Prepared soil
Shovel
Rake
Directions
- Shovel or dump soil into raised bed.
- Continue to fill the bed until you reach a ½ inch from the top rim.
- Smooth the soil surface out with a rake.
Plant your Raised Bed (edible garden)
Success is not only based on the soil but also how you plant your material. The directions below provide you a general guide on how to properly set up
and plant your garden design.
Supplies
Garden design
Knife or scissors
Small stones or mulch, optional
Ruler
Plants and/or seeds
Directions
- Move your supplies to your garden space.
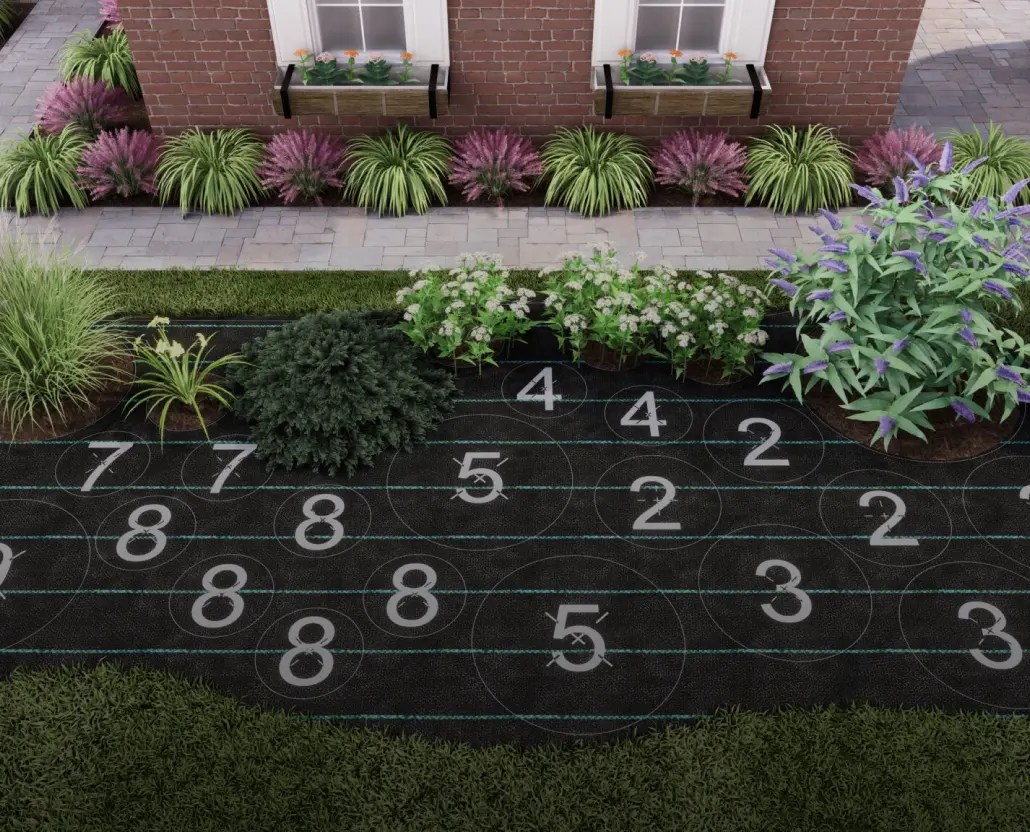
- Roll out your garden mat plan and place it on top of your raised bed.
- Place small stones or mulch along the other edge to hold down the garden mat plan.
- For each square foot, cut out each marking where the plant or seeds should go.
- Before opening up the marked space, refer to instructions for that particular plant or seed for the proper depth of planting.
- Open the indicated space, and dig the hole to the correct depth.
- Place plant or seed in the hole and fill in with the surrounding soil.
- Repeat the process until the garden mat has been planted.
- Once the garden mat plan has been completely planted, water the garden so that the soil settles around the seeds and/or plants.
Removing Sod for Garden Space or Landscape Design – Cut, Dig, and Roll Technique
If you are going to plant your garden plan in the ground then the sod will need to be removed. Below is one approach to removing the sod.
Supplies
Watering hose
Tape measure
Stakes or turf paint
String, optional
Edger or sharp spade
Garden fork, optional
Sod cutter, optional
Seasoned compost
Directions
- Measure and mark-off the garden space.
- Water the marked off area at least three days before you plan on removing the turf.
- Using the edger or sharp spade, cut the sod into one foot strips the length of the garden bed.
- Cut these strips into one to two foot lengths to make handling easier.
- Begin by prying one end of a stripe up with an edger or garden fork.
- Start to roll the strip as you continue to pry up the sod.
- Repeat with each turf strip until all sod has been removed from the garden space.
- If removing sod from a large area, one may consider renting a sod cutter to speed the process up.
- Replace lost topsoil with seasoned compost.
Removing Sod for Garden Space or Landscape Design – Tiller Technique
If you do not want to cut the sod out of your planned garden space then a tiller will be required. The general process of how a tiller works is it grinds up the roots and plant material into the soil. One disadvantage to this technique is you will bring up weed seeds that you will need to deal with when the seeds germinate
Supplies
Tiller
Tape measure
Stakes or turf paint
String, optional
Garden edger or spade
Seasoned compost, optional
Directions
- Measure and mark-off the planned garden or landscape space.
- If any of the area is curved, you will need to cut that area out with a garden edger or spade.
- If you want to add more organic material to the garden space, simply place it on top of the turf surface.
- Start the tiller and slowly run it over your garden space. Continue with this process until the soil is fine and there are no clumps of soil.
- If you have clumps of turf with soil still attached, pick up the turf and shake off the soil. Throw the turf away.
Removing Sod for Garden Space or Landscape Design – Smoother Technique
This technique will take the longest but it does not require equipment. The best part of the approach is once you have the ingredients down to smoother the grass, you plant directly on top of the prepared garden space without having to worry about weeds poking up or having special equipment.
Supplies
Newspaper and/or cardboard
Tape measure
Stakes or turf paint
String, optional
Compost, optional
Garden mat design
Directions
- Measure the garden space off.
- Mark this area with stakes or turf paint.
- Tie string to the stakes to outline the garden space, optional.
- Cover the area with six layers of newspaper or cardboard. Make sure to overlap both materials so no vegetation sticks through.
- You can add a layer of compost on top of the newspaper/cardboard to hold the material down prior to garden mat design, optional.
- Once the newspaper/cardboard is laid out, you can roll out your garden mat design and plant on top of this material.
Percolation Test – How well does your soil drain?
What is a percolation test? It is a soil test that is done to see if your soil is well draining. Why is this important? If you have soil that drains too quickly or too slowly then you will need to address the problem so that your garden space can be successful.
Supplies
Shovel
Watering hose
Tape measure
Stakes or turf paint
Seasoned compost, optional
Directions
- Do a rough measurement of the garden space and mark it with stakes or turf paint.
- Now that you have your garden space marked off, you can begin to plan the testing area. You will need one hole per two feet square. While you can measure and mark off these test sites, it is really not necessary for that level of accuracy. The goal is to have enough holes dug and tested so that you can get a clear picture of the drainage situation.
- Holes will need to be 1 foot deep and 8 to 12 inches wide.
- Once the holes have been dug and the depth has been measured, fill each hole with water and ignore for 12 hours.
- Refill the holes with water again.
- Notice the time and return to the holes after 2 to 3 hours. If the water is gone at this point, you have a drainage problem. If the holes still have water in them, return at the 10 hour mark. If there is water in the holes at this point then you have a drainage problem.
- Simply put if you have water in the holes at the 3 hour or 10 hour mark then you have a drainage problem.
- A hole that has drained at the 2 to 3 hour mark has a lot of sand. This problem can be solved by mixing in seasoned compost into the garden space.
- A hole that has not drained at the 10 hour mark has a lot of clay. This problem can be dealt with by mixing in seasoned compost.
- If the water in the holes has disappeared after 3 hours and prior to 10 then you do not need to do anything.
- If you find that you have mixed holes in your garden space then you will need to add compost to those areas with the holes that are problems.
Determining Full Sun, Partial Sun, Partial Shade or Shade
While you can look out at your planned garden space and guess what type of sun exposure it receives or you can use somewhat of a scientific approach to narrow down your area’s sun exposure. Keep in mind that the sun exposure is seasonal if deciduous trees are around the planned area.
Supplies
Notebook or paper
Pen
Clock
Ruler, optional
Directions
- Roughly draw out the garden space on paper. North the four directions on your rough drawing.
- Mark on your drawing where the sun hit your garden space at dawn. Repeat this process for midday, and dusk.
- If the sun directly hits your garden space for six or more hours then you have full sun.
- If the sun directly hits your garden space for four to six hours from midday on then you have partial sun
- If your garden space only gets direct sunlight for four to six hours before midday then you have partial shade.
- If your garden space is exposed to less than four hours of sun then you have shade.
- You will also need to note areas that are artificially shaded. These areas can be trees, fencing or buildings. If the artificial shade comes from trees then you will need to note if the trees are deciduous or evergreen. A deciduous tree will allow more sunlight into the area during the late fall through early spring while evergreens will not allow the amount of sunlight change.
How to Water Properly
While Mother Nature does not always drop moisture from the sky in the morning, which is best but you as the gardener can take control by learning how and when to properly water. Learning this skill will improve your yield and reduce the chances of developing a plant disease.
Supplies
Rain gauge
Watering hose
Spray head for watering hose
Directions
- Once the garden or landscape has been planted, it should be watered in but after that you will need to check the moisture level of the soil. Never simply assume that you need to water.
- To measure what Mother Nature provides, place a rain gauge in the garden space. When doing this, make sure the gauge is not obstructed by a tree or building that could block rain.
- A garden in the ground will need one-inch of water a week. A raised bed will need more water due to the fact that the bed is bottomless, which will not hold the water.
- Prior to watering, first check the rain gauge. If it indicates one-inch then do not water. Please also remember to pour the water out so that you can keep an accurate reading the next time.
- If the rain gauge does not indicate an inch of rain then you will need to water. Do not water your garden or landscape with a hard spray. Instead, place a spray head on the watering hose and gently water the soil not the vegetation. While natural rain does hit the vegetation, wet leaves and branches create wonderful environments for plant disease. In doing so, make every effort to water the soil. Also, try to avoid watering at night, which will increase the chances that your plants will develop some type of plant disease.
- If your garden is in a raised bed, do not just depend on the rain gauge. While the rain gauge will provide you information that the area received rain, you will need to know the moisture level of the soil. This is easily done with your finger. To test the soil moisture, simply push your finger down through the soil until you reach the knuckle and then pull it straight up. If your finger comes out dry then you need to water. On the other hand, if it comes up with clumps of wet soil on it then do not water.
Staking Plants 101
Providing the proper support for plants increases yields, reduces plant diseases, and reduces pest damage. Beyond the stake, the key is to make sure that you do not tie the plant so tight that it cuts or griddles the stem, which will cause death and/or reduced yield.
Supplies
Wooden stakes that are not made from pressure treated wood (minimum length 5 feet)
Hammer
Garden ties
Scissors or wire cutters
Cloth ties, optional
Directions
- Before moving on to the how-to part, it is always better to set the stakes when you plant. This will save you time when it comes to training the plant and it is easier on the plant.
- Set the stake four to six inches from the plant.
- Gently push the stake down into the ground until it supports itself. If you find it is hard to push the stake down then gently tap the top of the stake with a hammer until it stands on its own.
- Cut off about six-inches of garden tie. If you do not have a roll of garden tie material then tear an old tee shirt into strips.
- Starting about six-inches from the base of the plant, gently make on loop around the plant with the garden or cloth ties. Make sure this loop is loose so that it does not eat into the stem. Tie this tie to the stake. Repeat this process up every four to six inches. If you confront a branch, gently move the branch above or below the tie.
- Repeat this process until the plant is secured to the stake.
Landscape Fabric Maintenance
Landscape Fabric is a tool and like most tools does require some maintenance over there years. When used properly the benefits are fantastic. It saves you countless hours weeding your landscape beds, eliminates the need for harmful weed killers, and helps to conserve water.
Landscape Fabric is composed of a Woven Polypropylene. It is not biodegradable, but is not designed to be! The woven polypropylene fabric has tiny holes in between the weaves. Small enough to suppress weed growth but large enough to allow water, air and nutrients to pass through to the plants roots.
Most homeowners opt to cover their planting beds with mulch to add a nice clean manicured look and to help protect the plants roots and conserve water. And we recommend you do!
Over the course of a year mulch can start to break down. When this happens weed can blow into the bed and start to germinate. In order to prevent this, we recommend removing all of the mulch from the beds every 1 or 2 years and replacing it with fresh mulch. Not only will your beds look better and function better, but you will not have to worry about weed growth.